
*First, an apology: this post was supposed to go up yesterday but I dropped the ball. I don't think anyone was chomping at the bit with all of their finished full blocks so I hope you'll forgive me!*
So, you've finished your full blocks and you've got something that looks like this:
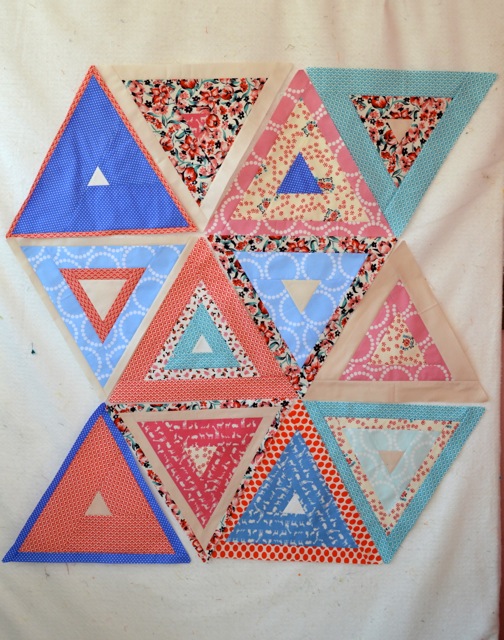
Right? Let's say yes. You may recall the incoherent rambling in this post about calculating the number of half triangles to cut for the centers of your half blocks. If I completely lost you on that, just lay your full blocks out on the floor or a design wall and take a look at what you'll need. For this arrangement (odd number of rows with an even number of blocks in each) I need 4 left halves and two right halves. That is because with an even number of pyramids in a row, the half blocks at either end of any row are the same, one is just rotated upside down.

As I said before, use larger triangles, rather than smaller for the center of the side pyramids. This is because an inch of the edge will get eaten up by the extra wide binding and you don't want all or most of the center to be hidden.
If you haven't done so already, cut your centers in half, parallel with the grain of the fabric.

Just like with the full blocks, sew strips to the sides of the centers, pressing seams open after each strip is added. The differences are that this time you are only sewing to two sides of the triangle and you have to make sure the strip on the top (the longer side) extends extra far so that it will meet the edge of the center (see the extra long pointy bits at the top of each block above). As you're sewing, trim the strips in line with that center edge.

Like before, it is handy to keep your template by your work space so you can check with each addition if your block is big enough. The edge of the block should be lined up with the red line on the template, which is an inch to the side of the center. Flip the template over to check blocks that oriented the other way.
When your block is big enough (as above) trim the bottom as usual and the angled side just to but not beyond the tip of the template.

Cut the blunt tip of the top of the template, remove the template and extend the cut using a regular acrylic ruler. Your block will look like the one above.

Et voila! All of my blocks finished. You can see all of the lopped off tips on the side blocks. They will all be covered by the binding.
You can find the rest of the quilt along at the following links:
And you can share your progress in the Flickr group, here!
I'm really excited to start this quilt.. Oh if life would slow down.
ReplyDelete