Tuesday, April 30, 2013

Log Pyramid Quilt Along: Making the Quilt Back


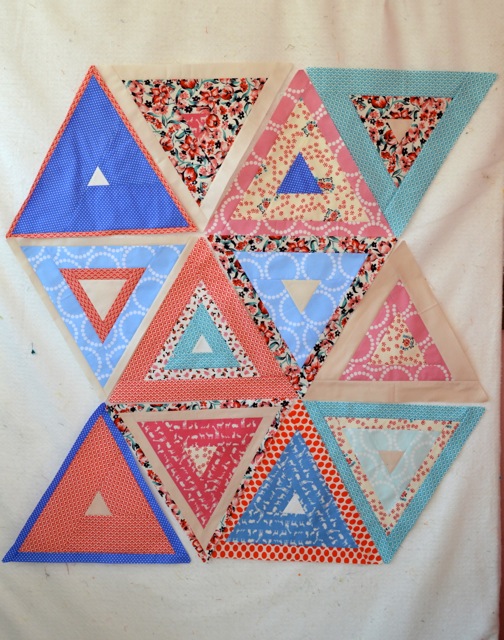
We're in the home stretch!  Remember, if you're making your own log pyramid quilt, add photos to the Flickr group!  It is currently very sad and underpopulated and it needs you!

My typical approach to making quilt backs is to use what I have, preferably leftover from the quilt top, to just get it done.  I don't like waste and I'm also usually pretty anxious to get a quilt finished by the time I get to the back.  After finishing this quilt I was left with a pile of unused strips of various lengths. I sorted them by length and sewed each group together then trimmed.


I ended up with the pieced sections you see below.  I then laid them out on my design wall to then figure out what size pieces I needed to fill in the gaps.  You can see that I pinned two tape measures to the wall to indicate how tall the back needed to be (the width of the wall was the same as the width I needed for the back).  You could do the same thing with masking tape or painter's tape.

***IMPORTANT***  In addition to the extra height and width you would normally add to a quilt back (typically two inches greater than the quilt top on all sides) you need to add another two inches to the height.  This is to allow for the extra wide binding without covering up a big chunk of your pyramids.


To fill in the blank spaces, measure the hole you want to fill and add seam allowance.  Add fabric to the smaller sections and as they get bigger, sew the larger pieces together like a puzzle.  I added the top left square first, then sewed the two pieces on either side of the top right strips, then did the same with the bottom left strips.  After the below photo was taken, I added a strip between the two pieces on the left and could then sew it to the long strip down the middle.  Just remember not to sew anything together that is only a partial seam.


And here it is all filled in.  I used all fabric that I had left over from the top.


Only one more post to go! You can find the rest of the quilt along at the following links:


  • Friday, April 12 - Fabric and supplies
  • Monday, April 15 - Making your template
  • Tuesday, April 16 - Cutting your fabric
  • Thursday, April 18 - Piecing the main blocks
  • Tuesday, April 23 - Piecing the side blocks
  • Thursday, April 25 - Making the quilt top
  • Tuesday, April 30 - Making the quilt back
  • Thursday, May 2 - Quilting
  • Friday, June 28 - Binding
  • Monday, July 1 - The End!


  • And you can share your progress in the Flickr group, here!

    Thursday, April 25, 2013

    Log Pyramid Quilt Along: Making the Quilt Top

    Before we get to the stitching I wanted to let you know there's now an official Log Pyramid Quilt Along Flickr group!  Find it here and share what you're making!


    Behold, the finished blocks:


    Now comes the easy part, sewing the blocks together.  Starting with the top row, you can see in the photo below I've already sewn the first two blocks together.


    I then grab the next in line off the wall and lay them out side by side to make sure it's oriented correctly.


    Then flip the new block over onto the old one.  Because of the handy little blunt corners on the template, you don't have to worry about lining the blocks up correctly.  The top corner of the new block should line up with the top edge of the row exactly.


    And the bottom two corners match up as well.


    Remember to press your seams open after each new one!  Here are all of my rows sewn together:


    To sew the rows together you just need to take a little peek to make sure your points line up.


    It's a good idea to put a pin at each point.  Remember that you're working with fabric and it's okay if things aren't exactly even.  Just pin all of your triangle points and don't be afraid to give a little tug when you're sewing to even things out.


    And there you have it!  Next week I'm going to wrap this baby up!


    You can find the rest of the quilt along at the following links:

  • Friday, April 12 - Fabric and supplies
  • Monday, April 15 - Making your template
  • Tuesday, April 16 - Cutting your fabric
  • Thursday, April 18 - Piecing the main blocks
  • Tuesday, April 23 - Piecing the side blocks
  • Thursday, April 25 - Making the quilt top
  • Tuesday, April 30 - Making the quilt back
  • Thursday, May 2 - Quilting
  • Friday, June 28 - Binding
  • Monday, July 1 - The End!


  • And you can share your progress in the Flickr group, here!

    Wednesday, April 24, 2013

    Log Pyramid Quilt Along: Piecing the Side Blocks


    *First, an apology: this post was supposed to go up yesterday but I dropped the ball.  I don't think anyone was chomping at the bit with all of their finished full blocks so I hope you'll forgive me!*

    So, you've finished your full blocks and you've got something that looks like this:


    Right?  Let's say yes.  You may recall the incoherent rambling in this post about calculating the number of half triangles to cut for the centers of your half blocks.  If I completely lost you on that, just lay your full blocks out on the floor or a design wall and take a look at what you'll need.  For this arrangement (odd number of rows with an even number of blocks in each) I need 4 left halves and two right halves.  That is because with an even number of pyramids in a row, the half blocks at either end of any row are the same, one is just rotated upside down.


    As I said before, use larger triangles, rather than smaller for the center of the side pyramids.  This is because an inch of the edge will get eaten up by the extra wide binding and you don't want all or most of the center to be hidden.
    If you haven't done so already, cut your centers in half, parallel with the grain of the fabric.


    Just like with the full blocks, sew strips to the sides of the centers, pressing seams open after each strip is added.  The differences are that this time you are only sewing to two sides of the triangle and you have to make sure the strip on the top (the longer side) extends extra far so that it will meet the edge of the center (see the extra long pointy bits at the top of each block above).  As you're sewing, trim the strips in line with that center edge.


    Like before, it is handy to keep your template by your work space so you can check with each addition if your block is big enough.  The edge of the block should be lined up with the red line on the template, which is an inch to the side of the center.  Flip the template over to check blocks that oriented the other way.
    When your block is big enough (as above) trim the bottom as usual and the angled side just to but not beyond the tip of the template.


    Cut the blunt tip of the top of the template, remove the template and extend the cut using a regular acrylic ruler.  Your block will look like the one above.


    Et voila!  All of my blocks finished.  You can see all of the lopped off tips on the side blocks.  They will all be covered by the binding.


    You can find the rest of the quilt along at the following links:

  • Friday, April 12 - Fabric and supplies
  • Monday, April 15 - Making your template
  • Tuesday, April 16 - Cutting your fabric
  • Thursday, April 18 - Piecing the main blocks
  • Tuesday, April 23 - Piecing the side blocks
  • Thursday, April 25 - Making the quilt top
  • Tuesday, April 30 - Making the quilt back
  • Thursday, May 2 - Quilting
  • Friday, June 28 - Binding
  • Monday, July 1 - The End!


  • And you can share your progress in the Flickr group, here!

    Thursday, April 18, 2013

    Log Pyramid Quilt Along: Piecing the Main Blocks


    All seams are 1/4".

    Start with one of your triangle centers and choose a strip to use for your first round of logs.  Sew the strip to one side of the center, right sides together but before you do make sure that the strip extends far enough on either edge.  Do not line the edge of the strip up with the tip of the triangle.  In the photo below the black lines show where the strip needs to extend beyond.


    Press the seam open and press the edge of the strip over 1/4" about 1" beyond the edge of the triangle as indicated by the arrows in the photo below.  This will help keep your edges "squared" ("triangled"?).  If you don't do this, the ends of the strips tend to bow out, away from the center.


    Trim the ends of the strip, in line with the edges of the center.


    Repeat the previous steps two more times to complete the round, making sure that each new log extends far enough beyond the edge of the block.  Keep a small ruler or other straight edge handy to check that your strips are aligned.


    Continue with a second, third and maybe fourth round until your block is at least slightly larger than your template.  For the larger, outer rounds you will obviously need longer pieces than for the inner rounds.  I would piece strips together, end to end to make them long enough before I would go back and cut another strip but if the piecing bothers you, by all means cut more.


    HOT TIP:  Keep your template next to your machine so you can check your progress as you add rounds.  I did not do this with the block below.  I ended up with a pyramid that was not quite at the edges of the template.


    If this happens to you I recommend trimming the edges of the triangle (you can use your normal acrylic ruler lined up with the inner seams) and then adding a final round.


    When your block is large enough, lay your template on top and center it, using the black guides.  Each line should pass through the corners of each round of triangles like the photo below.


    If you can't quite get the guides to match up with the corners don't panic.  Fabric shifts and stretches and it happens.  It's most important to line up the outermost corners (the pink ones in this case).
    Trim around the template and you're done!

    HOT TIP part deux: Because you have to press each and every seam before you add another log, I highly recommend that you assembly line this mother.  Start with a stack of centers, sew the first strip onto each, press open, trim and repeat.  Resist the temptation to finger press and add another strip the way you might do with a tradition log cabin block.  It will be very hard to keep your edges straight with this method.

    Tuesday, April 16, 2013

    Log Pyramid Quilt Along: Cutting Your Fabric


    First, the center triangles.  I used mostly neutral fabrics for my centers with a few colored triangles thrown in for fun.  You'll need one for each of your full blocks and a half triangle for each of your half blocks (duh).  There is a little tricky bit to the half-block centers but I'll get to that later.

    Cut strips from various fabrics, at least 2.5",  no wider than 6".  Line up the 60* guide on your acrylic ruler and cut off the corner like so:

    Turn your ruler and line up the other 60* guide with the bottom edge.  You can slide the ruler left or right to make the triangle larger or smaller.  Cut that sucker.


    Turn your ruler again and you can cut another triangle.  See how I made a smaller one?  (NOTE: in this case I had to trim a little bit off the end before cutting another center to get rid of that blunt corner.)  (ALSO NOTE: if you're using scraps for your centers you can fussy cut your triangles any which way you want.)


    For the half pyramids you want to use larger rather than smaller triangles.  As for the number you'll need for the half pyramids: if the number of blocks in your rows will be odd, just cut another center for each row.  If the number is even and the number of rows is even, same.  If the number of blocks in a row is even BUT the number of rows is odd, you'll need one for each row plus one.  Example:


    In my original quilt there's an even number of full blocks in each row (6) and an odd number of rows (5).  I needed to cut 6 centers for the half pyramids in order to have enough of the right orientation.  Is that confusing?  Probably.  You could also just cut a bunch of triangles and figure it out later!  Alternatively, you could make sure to use a reversible solid for at least on of your side blocks, then you could flip it to be which ever orientation you need.

    If you manage to figure all of that out, take your centers that will be used for the half pyramids and cut them in half like so.


    Now for the logs in your log pyramids.  If you cut your triangles from width-of-fabric strips, reserve the leftover strips to be used as logs.  If they are wider than 4", cut them in half lengthwise before using.  Cut the remaining strips at least 1" wide, no larger than 4" wide.  I recommend cutting two strips for every width that you cut from each fabric.  This way you should have enough to complete a small round and a big round of logs without having to cut more.
    You can refer to this post to get an idea of about how much fabric you'll need.  Again, you'll need about a yard worth of strips for every four blocks you make.  Of course, this is an estimate.  Just do what I do, cut a whole bunch of strips, cut more as you're piecing if you need them and use any leftovers in the quilt back.


    Here are my strips and centers, cut and ready to go!


    You can find the rest of the quilt along at the following links:

  • Friday, April 12 - Fabric and supplies
  • Monday, April 15 - Making your template
  • Tuesday, April 16 - Cutting your fabric
  • Thursday, April 18 - Piecing the main blocks
  • Tuesday, April 23 - Piecing the side blocks
  • Thursday, April 25 - Making the quilt top
  • Tuesday, April 30 - Making the quilt back
  • Thursday, May 2 - Quilting
  • Friday, June 28 - Binding
  • Monday, July 1 - The End!


  • And you can share your progress in the Flickr group, here!

    Monday, April 15, 2013

    Log Pyramid Quilt Along: Making Your Template


    First, a retraction.  Sorry guys, I goofed but it's a small goof so you can relax.  I originally said you needed two sheets of 12"x18" template plastic to make your template but you can easily make it work with one.  So scratch that.  If you bought two, I'm sorry.  The bright side is you've got an extra sheet you can use for another project!  Or you can return it to Joann's, either way.

    To make your template, first print out all three sheets of this pdf file.  When printing, be sure you do not scale the image at all, it needs to be at 100%.  You don't need to cut your paper pieces out completely, just trim off the right side of piece A and the bottom of piece C, then tape the pieces together like the diagram below.  Be careful to line up the black and red guides.

    You will have something that looks like this.


    Lay your sheet of template plastic over the paper template, lining the bottom edge of the plastic up with the bottom of the template.  With your Sharpie, draw a line to the left of the template.


    Cut along the line you just drew and tape the piece you cut off to the top of the larger piece of plastic, butting the straight edges together and making sure the plastic now completely covers the paper template.  Make sure the bottom edge of the plastic perfectly aligns with the bottom edge of the template and tape the bottom edge to the paper.  Use your permanent markers (black and red if you have them, otherwise don't sweat using the same color) and a ruler to trace the black and red guide lines on the template.  If you're going to cut the plastic with scissors you should also trace the template outline.  Don't worry about the stitching lines, they're just there to be pretty.


    If you're using scissors, remove the paper and cut out the template.  If you have and exacto knife and metal ruler, use them to cut along the template edges.  And, voila!  You're done.


    There is one other option that I doubt any of you are nuts enough to do but I was!  I took my template file to an acrylic shop and had a clear acrylic template made.  It was certainly pricier but I will admit, I didn't shop around and just found someplace local that could do it (I was impatient).  I mention it because that is the template you will see me using for the remainder of this quilt along.  I didn't want you to be alarmed.


    You can find the rest of the quilt along at the following links:

  • Friday, April 12 - Fabric and supplies
  • Monday, April 15 - Making your template
  • Tuesday, April 16 - Cutting your fabric
  • Thursday, April 18 - Piecing the main blocks
  • Tuesday, April 23 - Piecing the side blocks
  • Thursday, April 25 - Making the quilt top
  • Tuesday, April 30 - Making the quilt back
  • Thursday, May 2 - Quilting
  • Friday, June 28 - Binding
  • Monday, July 1 - The End!


  • And you can share your progress in the Flickr group, here!

    Friday, April 12, 2013

    Log Pyramid Quilt Along: Fabric and Supplies


    To make your own Log Pyramid quilt you will need the following supplies:
    • *EDIT* One sheet (not two) of 12"x18" clear template plastic (you can get this on Amazon or Joann Fabrics or check with your local quilt shop).
      • NOTE - You really really really need to get clear or at least semi-transparent plastic for this, otherwise you won't be able to line up your template properly.  I would normally use card stock or something else I have around the house to make templates but having something clear will really help you out with this pattern.
    • A sharpie or other permanent marker
    • Rotary cutter, cutting mat and acrylic ruler
    • Printer paper, tape and the ability to print this template
    • Scissors or an exacto knife and metal ruler to cut template plastic
    And...FABRIC.  Because this is a free quilt along and not a serious, hardcore pattern I'm going to be a little loose with my fabric measurements.  There's a lot of improvising in this pattern and so I'll give you some general suggestions on how much fabric you need and how much to cut but there will come a point when you will probably have to wing it.  So here it goes.

    You will need various prints and solids that can be cut into long strips.  Fat quarters will work but you will need to piece strips together if you use them for the outer rounds of your blocks.  You can use smaller pieces and scraps for the triangle centers of your blocks.  I recommend choosing a balance of solids and prints, erring towards more solids if possible.  I also made sure to include a fair amount of neutral fabrics to keep things from looking too crazy.

    As for quantity, you'll need about a half yard's worth of various strips for every four pyramids you make.  The new version I'm making for this quilt along will be made up of 12 full pyramids and six half pyramids in three rows and will end up being about 44"x47", a nice sized baby quilt.  The original log pyramid quilt was made up of 30 full and 10 half pyramids in five rows and was about 61"x78".  Below is a table that gives the number of pyramids you'll need to make standard sized quilts as well as an estimate of the total number of yards you'll need of various fabrics for your top and binding.

    Quilt Size Finished Measurements # of Rows # of Pyramids per Row # of Full Pyramids # of Half Pyramids Total Yards of Fabric Needed for Top Yards Needed for Binding
    Baby 44"x47" 3 4 12 6 3 1
    Lap 53"x62" 4 5 20 8 4.5 1 1/8
    Twin 70"x92" 6 7 42 12 8.5 1 3/4
    Full 87"x92" 6 9 54 12 10 2
    Queen 95.5"x92" 6 10 60 12 10.5 2
    King 104"x107" 7 11 77 14 13.5 2


    You will also need enough batting and backing fabric for your finished size.  

    Wednesday, April 10, 2013

    Log Pyramid Quilt Along

    It's official, next week I'll be starting the Log Pyramid Quilt Along!
    In case you missed it, the original Log Pyramid quilt was part of the show at QuiltCon and now you, gentle readers, can make your very own version.  Over the next few weeks I will be making a new version of the pattern and letting you all in on the process.  My new quilt will be a smaller, baby quilt version of the pattern but I will provide instructions for any sized quilt.  I hope you will join me!


    You can find the rest of the quilt along at the following links:

  • Friday, April 12 - Fabric and supplies
  • Monday, April 15 - Making your template
  • Tuesday, April 16 - Cutting your fabric
  • Thursday, April 18 - Piecing the main blocks
  • Tuesday, April 23 - Piecing the side blocks
  • Thursday, April 25 - Making the quilt top
  • Tuesday, April 30 - Making the quilt back
  • Thursday, May 2 - Quilting
  • Friday, June 28 - Binding
  • Monday, July 1 - The End!


  • And you can share your progress in the Flickr group, here!


    I'll add the links to this page as they go up as well as a link to the QAL page in the righthand column.