Thursday, June 28, 2007

Pirate Quilt for a Girl Pirate

My pirate loving friend Melissa is having a birthday this weekend, the perfect opportunity to make her a Jolly Roger-inspired doll quilt.
Just what she needs to do some serious swashbuckling.
I made the quilt using this awesome method, which I first saw here.
Then got myself some freezer paper. (Note to Southern Californians: I bought this at Vons, they didn't have any at Ralph's or Target)
I drew a skull and crossbones, cut it out with an exacto knife and ironed it onto the quilt. Then I dabbed on some white screen printing fabric paint.
In case you're wondering, yes I did quilt the entire quilt before doing the stencil and yes, that was not the best idea. The reason I did it was because I didn't have any freezer paper when I started the quilt and I was too excited to stop working on it. So the stencil isn't perfect but I'm okay with that. Pirates aren't perfect either.
The quilt is not actually a flag, I just basted on some temporary ties for a photo shoot. I tried to take pictures of it hanging in front of our house but our house just isn't very nice looking, especially around the little flag pole holder. So I had to recruit some pirate models.
The matching outfits are a coincidence.

Wednesday, June 27, 2007

Summer accesories abound

What I didn't tell you the other day is that I started to make the summer slippers because I was waiting for some fabric to be washed and dried, fabric that was destined to become this hat from Lotta Jansdotter's "Simple Sewing".
I was so anxious to make that hat that I had to make something else while I was waiting.

I had seen several cute versions of this hat on the internet and as I went out to garden the other day, wearing Harv's stinky old baseball hat, I decided that I needed a special summer hat of my own. So the next day I went out, bought the book then made meself a hat.
The fabric is some Etsuko Furuya from Repro Depot and the lining is Amy Butler. I agree with others that the crown is a bit big but I am trying to embrace it. I do after all, have a very large head so it kind of works on me.
As for the book, I love it. I love her style and I love that it comes with full sized pattern pieces.

Sunday, June 24, 2007

Summer Slippers

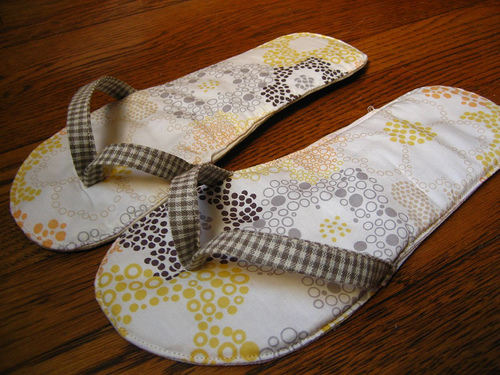
It's hot here. Very hot. And it's only going to get hotter as the summer goes on. So what's a gal to do when she wants to shuffle around the house in her comfies but it's to hot for her trusted slippers? She makes summer slippers! These slippers give you something soft and stylish to lounge around in while trying to stay cool.


You will need: at least one flip flip that fits your foot, some vinyl, cotton fabric for the top of the slippers (call it your main fabric), muslin or something that kind of matches your main fabric (this fabric is not meant to be seen but you might get a little bit peeking out of the edge of your slippers so pick something that will be camouflaged), bias tape 1/2 inch wide or fabric to make your own bias tape, for the straps and batting (I used polyester because it is fluffier and it will hold up better under my feet).

Also handy: disappearing fabric marker, bias tape maker (if you're going to make your own) and a walking foot for your machine. You don't have to use one but I did. Now that i have one I find myself using it more often than not. It's awesome.


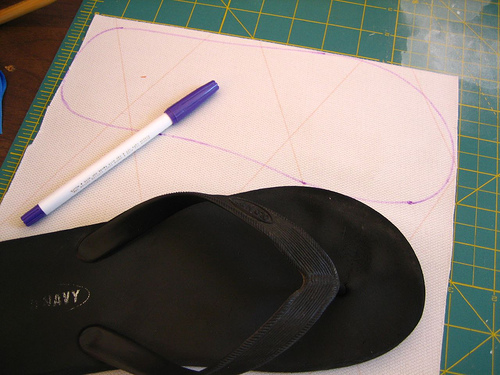
1. On the back side of your vinyl, plop down your stinky old flip flop and trace the sole using a disappearing marker. Now fold the vinyl over on itself, right sides together and pin around the sole outline so you have two layers of vinyl. Don't pin inside of the outline because the pins will leave visible holes in the vinyl. It doesn't bounce back like regular fabric. Once you're pinned, cut along the outline. Now you have a sole for each foot!

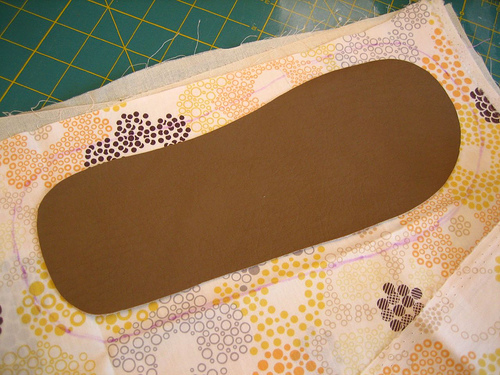
2. Use one of your vinyl soles as a template and lay it over your main fabric and your muslin, each folded in half, right sides together. Trace around the soul, about 1/2 in away from the edge of the vinyl. This does not have to be perfect. If you're scared, give yourself more than 1/2 of an inch. Now pin it all together and cut on the line.
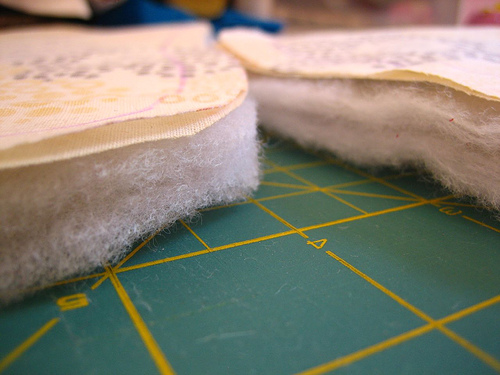
Repeat this step with the batting. I used two layers of batting for each slipper which means you need to cut out four pieces. Remember to add the roughly 1/2 in seam around the batting as well!

3. Layer your pieces as so: two pieces of batting on the bottom, muslin in the middle and main fabric, right side down, on top. Be sure you've got right and left foot accounted for. Pin it all together (I didn't...I'm sorry, I'm reckless).

4. Now take one of your vinyl soles and center it over one of the little stacks that you just made. Trace around the exact edge or the vinyl, then put the vinyl aside. This is your sewing line. Sew along that line, around the entire perimeter of the stack, leaving a two to three inch opening on one side for turning.

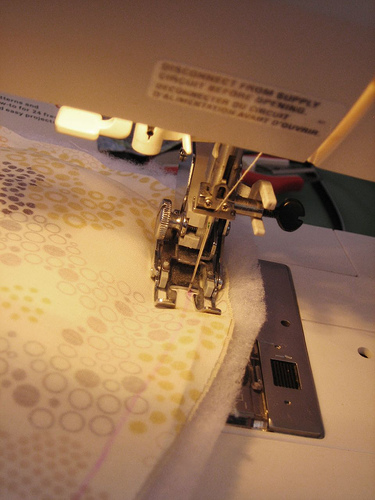
Repeat with the other stack.

5. Trim the seam allowance to 1/4 of an inch on both slippers.
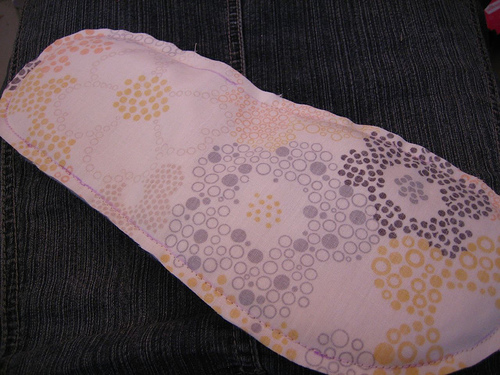
Now turn the insole right side out, so that the main fabric is on top, the muslin is on the bottom and the batting is in the middle. Make sure that the seam allowance on the opening is tucked inside, feel free to press it if you want.

5. For the strap, I made my own not-on-the-bias tape (it doesn't need to be cut on the bias for this). I cut a two inch wide strip of fabric,
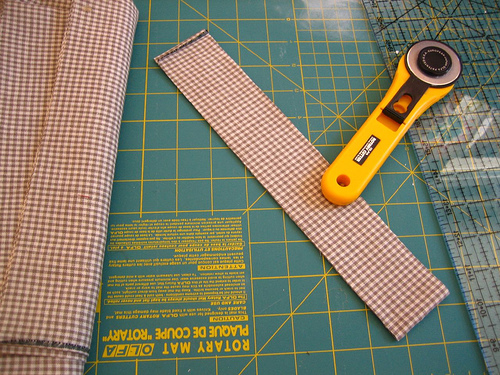
then I fed it through my bias tape tool and pressed. If you don't have one of these, for this project you can just fold the two sides of the strip into the center and press.
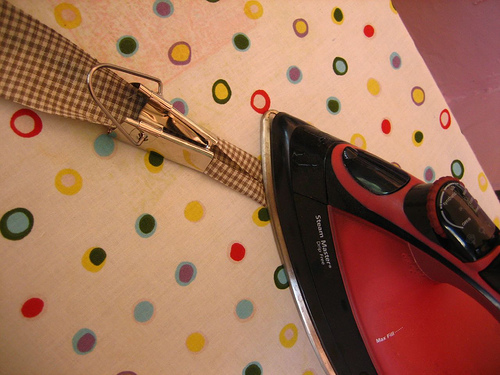
Then fold the whole thing in half and press, so that you have half inch tape. You can of course use premade bias tape.
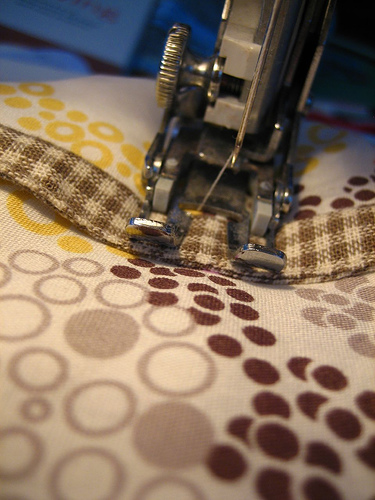
Next, sew along the open edge of your tape like so:
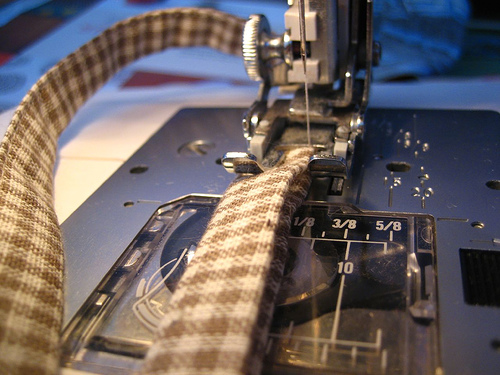
You need 12 inches of tape for each slipper.

6. Put your turned out insoles on the floor and center your feet over each one. With your disappearing marker, make a mark in between your first and second toes on each insole. This is where you are going to sew down the center of your strap.
Cut a 12 inch piece of the strap. Pin the strap to the insole where you marked between your toes. The strap should be perpendicular to the insole (like a cross) and there should be five inches of strap pointing towards the inside (where your big toe is) and seven inches of strap on the other side. Sew over the strap at the between your toes mark, back stitching several times.


7. Put the slipper back on the floor and put your foot back on it, this time with the straps coming up from between your big and second toes. You want to mark where the straps will be sewn on the edge of the slipper so pull them over your toes to fit your feet. They should be tight enough to stay on but loose enough that they are easy to slip on. Make a diagonal mark on the straps, where they meet the side seams and mark the side of the slipper, on either side of the straps. Take your foot out and pin the straps in place, lining up the marks and wrapping the excess strap under the insole.
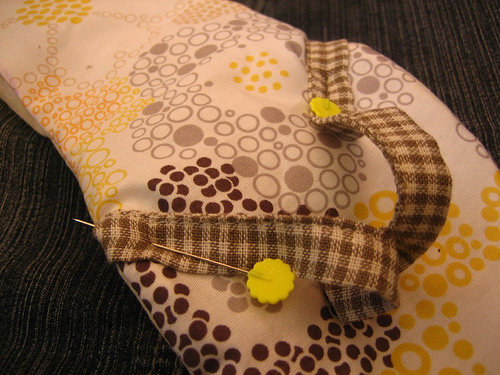
Trim the straps so that there is only 1/2 an inch pinned underneath the insole.

8. Lay the insoles on the vinyl soles, wrong sides together and edge stitch all of the way around the slipper, over the straps and closing the opening you left for turning. If necessary, trim the vinyl to match the insole.

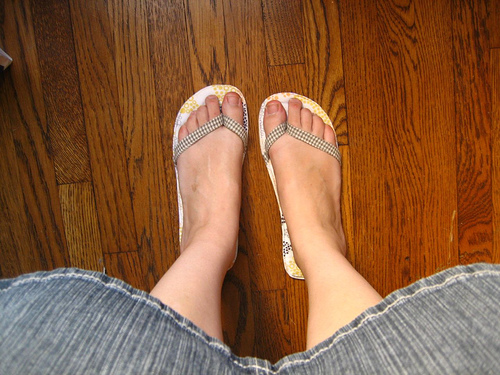
Done! Now get comfy and stay cool!

Thursday, June 21, 2007

Mail Call

I've had some wonderful mail lately:
1. My first Moo cards. I am amazed at how nice these are! I highly recommend them. I had my blog address printed on the back so I can direct people who might be interested here without saying "GO TO MY BLOG!" I don't like to talk about blogging or crafting too much with non-bloggers or non-crafters, for fear of being annoying or misunderstood. But some people are interested, so this is a nice gentle way to bring them here.
2. This lovely book! Very very pretty...I started reading last night. Even though I know how to sew I still enjoy reading about how to do things. It's the same with other things too like knitting and animation. I really like thinking about the process.
3. Knitpicks yarn to make this pattern. I'm not sure what I was thinking here. I want this sweater but come on! A sweater out of fingering weight yarn? Am I an idiot? I should finish this in about 5 years. You can see that I started a sleeve. What do you think...is that about .0001% finished? I am committing. I will wear this someday.

Tuesday, June 19, 2007

Quilts, quilts, quilts

I am very happy to have several new quilts in the works.
First is a queen sized(my biggest yet!) Denyse Schmidt-ish quilt for my sister Lauren. As it is a belated birthday gift and she has given me a lot of input on the design and colors I feel free to post progress pictures here. I want to be sure that I am making something that she will like and use. There is nothing sadder than an unappreciated handmade gift, yet they are given all of the time! I hope that we can avoid that happening here with some early consultations.
The second new quilt is a miniature quilt I am making for a friend's upcoming birthday. This one will not be belated! Here's a little sneak peek:Once it is given I will share all of the details. I am having so much fun with this one that I am almost done with it, even though the birthday is not for a while!
And of course, we can't forget "Doll Quilt Swap II"! I have not yet started my quilt for the swap but I have an idea that I am very very very excited about. I can't wait to share! I am also excited that so many people signed up for the swap and glad that I signed up early. I am so sorry for all of you who wanted to participate but didn't make it before the early cut off. I am sure that there will be many more opportunities in the future.

Monday, June 18, 2007

My Friday Night

Finishing a few more ripples and catching up on Grey's Anatomy in the great outdoors.

Thursday, June 14, 2007

More Eighties Fun

The birthday boy was inspired by the Star Wars coasters and dug out some homemade Pac-Man valences that he found at a thrift store years ago (seen here atop a tall tall building that has made numerous Robot Chicken appearances).
They are just panels of Pac-Man fabric folded in half and stitched around the perimeters, with a pocket left at the top for a curtain rod.
I am going to make him something with the fabric and then I'll keep the rest as payment. We are thinking maybe a lap top cozy or more coasters.

Monday, June 11, 2007

Star Wars (Really?)

More coasters.
I woke up tres early this morning to make these before work. Today is one of our co-workers' birthdays and the thrill of actually giving someone a gift on their real live actual birthday was so exciting that I just had to get this done. So imagine my disappointment when I arrived at the studio this morning and overheard that he was not coming in today! Luckily, the birthday boy lives less than a block from the studio so I'm going to stick the package in his mail slot at lunch.
The coasters are made out of more pieces of a "vintage" Empire Strikes Back bed sheet that I used to make this quilt for Harv. I threw in a bunch of scrap cotton and scrap batting and voila. This one is my favorite.
So, while we're on the subject of Star Wars...I am getting to know my audience here and there is a dramatic difference in the amount of interest that exists for my most awesome crafts and pretty much everything else (less awesome crafts, reasons for not crafting, work, house, most everything else). This is understandable of course but it is not going to prevent me from updating you all on certain happenings, especially the big work stuff. I spend way too much time animating for it not to seep into this blog every once in a while!
I would therefore like to insist that you watch the "Robot Chicken Star Wars" Special. It is airing on Sunday, June 17 at 10pm (maybe earlier if you're central, I'm not sure) on Cartoon Network. For those of you who don't know, my husband Harv and I are both stop-motion animators working at a studio that produces two shows for Cartoon Network's Adult Swim, Robot Chicken and Moral Orel. Last fall we produced an officially Lucasfilm sanctioned half hour special (which is a really big deal as all original official Star Wars content in the past has been created from within Lucasfilm except for one guy who wrote some novels (nerds, I'm sorry if I didn't quite word that information correctly)) and it is honestly very cool. And I'm not a big Star Wars nerd like many of the people around here, yet still, I think it's funny. I know that you all are mostly not Star Wars nerds either but I'm pretty sure that some of you at least have an inkling of Star Wars nerdiness...or you're just married to a Star Wars nerd. So watch! And look out for the Ponda Baba sketch as it was animated almost exclusively by me. (Ponda Baba's the guy who has tusks on his face that, I'm sorry, look like balls. Or an ass if you want to be a little less graphic. Here's a picture of him. Look for this guy.)

Thursday, June 07, 2007

A Soon-To-Be Becurtained Craft Room

Having my craft room functioning again has really made any time that I am not at work utterly craft filled, as it should be. But yesterday I just wasn't feeling so hot all afternoon and I made the declaration that "Tonight, I am going to take it easy."
Nuh-uh. That was until I came home and saw this on my doorstep!
Twelve wonderful yards of this fabric ordered from Repro Depot; cafe curtains for 6 of the 7 windows in my room. (Actually there are two windows, one door with a window and a set of French doors that lead into the rest of the house in addition to the 7 windows that actually look outside. Those will not be curtained.)
Of course I got straight to work. Here is one set finished:Here is the rest of the windows, still naked:
And here is the pile of unfinished curtains, cut, sides sewn, awaiting my return tonight:
I just had to finish and install one set last night so that I could see how pretty they would be with the light shining though them this morning. Pretty. I am very satisfied with my choice.

Tuesday, June 05, 2007

Time to start drinking

I've finished the new project that I mentioned the other day:
Coasters! I am really happy with the way that these turned out. They are made out of cotton fabric and batting and silk screened with sweet little animal motifs on top. I've been wanting to do something like this for a while now, silk screening over quilting. I was initially planning on quilting more than this but I really like the simplicity of this. They are for sale in my Etsy shop.

In other news, my sister Lauren's birthday is tomorrow and I told her I would make her a quilt for her new queen size bed. And I haven't started it yet. Yeeps.
I asked her in February if she would like one for her birthday. I didn't want to just surprise her with one. That would pretty much guarantee that she wouldn't like it. I have such difficulty making gifts that I know that people will like...I usually just make gifts that I really like. So she said that she wanted one and I thought "It's February! June is so far away!" June 6 seemed very very far away ever since then. But now it's tomorrow. Oops. This weekend I plan on getting that well underway. I am very excited because after showing her several options that I could make for her, she chose something like this or this. I love these quilts, I can't wait to make one!

Monday, June 04, 2007

Summer Sacks

Three summer sacks have been put up in my Etsy shop. This one and two others in different fabrics. Check them out!

Thanks for the loving!

Thank you all so much for all of your sweet comments on my Whiplash quilt! You guys are so nice! I have been so down for the past month, with my craft room unusable and nothing to blog about. I am so happy that you all are still here to give me feedback, even though I have abandoned you for so long! Blogging about my work is such a great motivator. I love you internet!
I spent all weekend working on stuff. It was great. I made a few purses a la this that I am going to *gasp* put up in my shop later today. I know! Can you believe it? I never put anything in my Etsy shop! Well, I really hope to change that soon. During my crafting drought I had a ton of great ideas for things that I would love to send out into the world. One of which I started some work on this weekend. I am hoping to finish them tonight but I will give you a little sneaky peek right now:I am very excited about this! Can't wait to show you the finished product!